Recently I was toying with a Raspberry Pi 2 and other hardware to get a better idea about the current status of the Internet of Things. Among several sensors, I was also looking into a Honeywell HIH8131 sensor (around 25 Euros, obtained from Reichelt). Unfortunately, none of the solutions I found on the web for reading the sensor worked for me, so I finally went down into the low-level details of communicating via the I2C bus through the Linux kernel. And I enjoyed it!
Preparations
In order to enable support for I2C in the kernel on the latest Raspbian Linux (similarly on other Debian-based distributions like Ubuntu), you need to install the respective libraries and enable support for I2C in the kernel. The former is achieved via
sudo apt-get install libi2c-dev
sudo apt-get install i2c-tools
The recommended way to enable I2C support in the kernel is to run
sudo raspi-config
and then navigate to "Advanced Options" -> "I2C" -> "Yes". You may also enable I2C manually on the Raspberry Pi if you feel like it.
Hardware
Some effort is required to get the SMD sensor package physically connected to the Raspberry Pi. The two resistors and two capacitors needed (Figure 3 in the HIH8131 datasheet) were quickly soldered to a prototype, while the soldering of the SMD pins was a bit trickier. Finally, I added a female pin head connector (2 rows) to achieve the necessary mechanical stability. The following pins were connected:
- Raspberry Pi 2, Pin 1 (3.3V), to Pin 8 on sensor (VDD)
- Raspberry Pi 2, Pin 3 (SDA), to Pin 4 on sensor (SDA)
- Raspberry Pi 2, Pin 5 (SCL), to Pin 3 on sensor (SCL)
- Raspberry Pi 2, Pin 9 (GND), to Pin 2 on sensor (GND)
According to the datasheet, you also want to connect pin 1 (VCORE) to connect via a 100nF capacitor to ground. Here are two picture of the final hardware shield (apparently this is not industrial quality. Feel free to design a PCB layout):
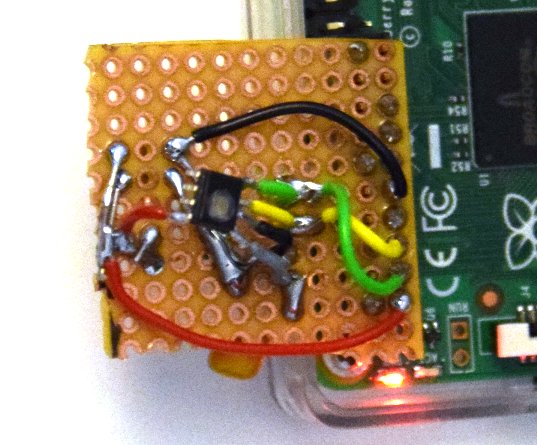
Top view of my HIH8131 shield for the Raspberry Pi 2.
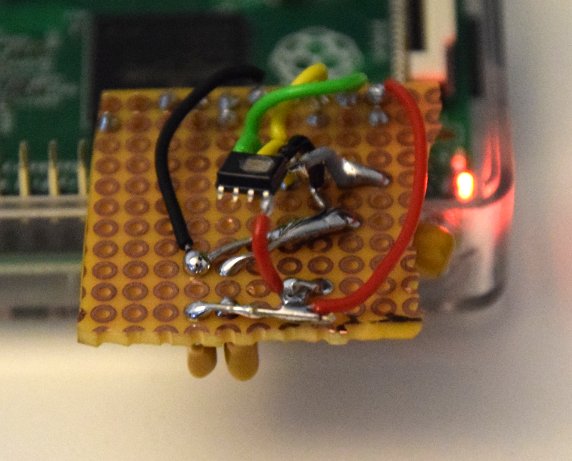
Front view of my HIH8131 shield for the Raspberry Pi 2. The sensor floats about 2 centimeters above the prototype board.
Sensor Readout
Once you've got the hardware ready, make sure the device can be found on the I2C bus. To do so, issue
$> sudo i2cdetect -y 1
You should receive the following output if the hardware is connected properly:
     0  1  2  3  4  5  6  7  8  9  a  b  c  d  e  f
00:          -- -- -- -- -- -- -- -- -- -- -- -- --
10: -- -- -- -- -- -- -- -- -- -- -- -- -- -- -- --
20: -- -- -- -- -- -- -- 27 -- -- -- -- -- -- -- --
30: -- -- -- -- -- -- -- -- -- -- -- -- -- -- -- --
40: -- -- -- -- -- -- -- -- -- -- -- -- -- -- -- --
50: -- -- -- -- -- -- -- -- -- -- -- -- -- -- -- --
60: -- -- -- -- -- -- -- -- -- -- -- -- -- -- -- --
70: -- -- -- -- -- -- -- --
This shows that a device is found with I2C address 0x27 and ready to use.
Since I couldn't find a ready-to-use software/script to read out the sensor, I finally came up with a small C program to read the raw data from the sensor. The code is available in my Honeywell I2C Sensor Reader GitHub repository for reuse. It uses the SMBUS interface routines in the Linux kernel and communicates via read() and write() routines. The only tricky part is to trigger the measurement, which requires an I2C message of zero byte length (i.e. just the device address) sent to the sensor. The routine to accomplish this is `i2c_smbus_write_quick()`.
Compiling and running the program is straight-forward:
$> make
$> ./i2cHoneywellHumidity
Humidity: 39.415212
Temperature: 22.406300
The many digits after the decimal point are of course meaningless, but you can adjust the output format as needed anyways 😉
The only thing you should be careful about is to place the sensor away from the Raspberry Pi, because the Raspberry Pi heats up slightly over time and thus introduces a small increase in temperature (and thus a small drop in relative humidity) in its vicinity. You can address this through air convection as well.
Conclusions
Interfacing sensors on the Raspberry Pi is fun and feels much more like the early days of computing with low-level access to hardware. The HIH8131 used for this experiment may be a little too expensive to be attractive for widespread use, as there are cheaper alternatives such as the DHT22. On the other hand, the Honeywell sensors are among the most accurate on the market and their low mechanical dimensions make them attractive for integration into wearables and the like.
This blog post is for calendar week 9 of my weekly blogging series for 2016.